How to use an Ophthalmoscope for Eye Exams
10/29/2018 09:53:38

Nearly half of US adults receive an eye exam each year, totaling roughly 114 million annual eye exams. An ophthalmoscope is the primary instrument used to test the health of an eye during an exam. In order to properly use an ophthalmoscope, it's important to first understand the anatomy of the eye, how the instrument works, and which eye problems an ophthalmoscope can diagnose.
Overview of Using an Ophthalmoscope
- What is an Ophthalmoscope?
- Features of an Ophthalmoscope
- How to Use an Ophthalmoscope
- Common Ophthalmoscopic Observations and Diagnoses
In this article, we will answer a number of questions, such as: What exactly is an ophthalmoscope? How do I use one? What does an exam reveal about the health of the eye? In order to properly tackle these subjects, we will need a basic understanding of the parts of the eye, so let's start with a quick anatomy lesson:
The fundus of the eye is what we call the interior surface of the eyeball, opposite the lens. The fundus is comprised of the retina, optic disc, fovea, macula, and posterior pole. The pupil is the hole in the middle of the iris that allows light to enter (usually this appears black). The innermost lining of the eye, the retina, can be thought of as a light-sensitive screen that makes sense of the images it receives by sending electrical neural impulses to the brain. The retina is actually part of the central nervous system and is the only part of the human body where one can visually observe vascular activity from the outside.
The transparency of the cornea, lens and vitreous humor allow for clear viewing of the structures of the fundus with the right ocular equipment. This is where ophthalmoscopy comes in and when an ophthalmoscope is used.
What is an Ophthalmoscope?
Ophthalmoscopy, also called fundoscopy, refers to the type of testing specific to eye examinations that allows a healthcare professional to see inside the fundus of the eye. The ophthalmoscope, sometimes referred to as a fundoscope, is one of a multitude of instruments by doctors and medical professionals to examine the eye. An ophthalmoscope is not the same thing as an otoscope (an otoscope is a related medical instrument that is used to exam the throat or ears).
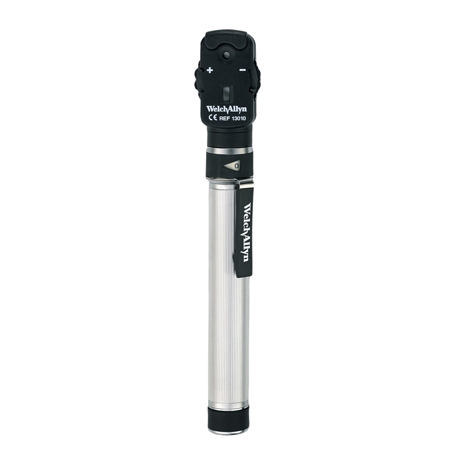
Many of the ophthalmoscopes used today are what we would refer to as pocket ophthalmoscopes. Welch Allyn is a commonly-used brand of lightweight and compact pocket scopes and they have a product group named PocketScope. Two common PocketScopes are the PocketScope 12800 rechargeable model and the PocketScope 12820 that uses AA batteries. While the ophthalmoscope is a relatively simple and easy-to-use tool, it does require practice to master.
Features of an Ophthalmoscope
An ophthalmoscope is known as a coaxial optical system in which the axis of illumination coincides with the axis of vision into the retina. In other words, the ophthalmoscope eliminates shadows in a way that allows for a clear fundus examination despite the naturally small size of the pupil. It's a standard tool in any well-stocked medical supply closet .
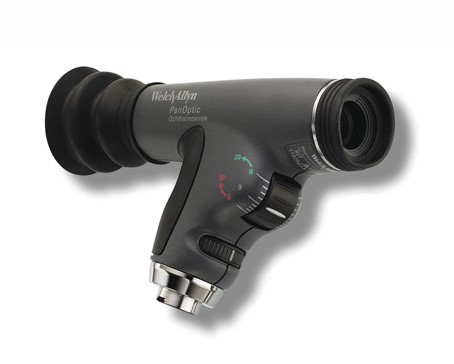
There are two types of ophthalmoscopes: traditional direct ophthalmoscope, and PanOptic or indirect ophthalmoscope. A direct ophthalmoscope produces an upright (unreversed) image of the center of the retina at approximately 15x magnification. A PanOptic ophthalmoscope (also called a binocular indirect ophthalmoscope) produces an inverted (reversed) image of your retina in its entirety at approximately 2x to 5x magnification.
An ophthalmoscope has the following features:
Aperture (filter dial)
The aperture selection disc or filter dial enables the ophthalmoscope to be used for different purposes by modifying how much light is allowed through the lens.
Rheostatic switch
This control switch powers the light source and allows the practitioner to manually adjust the brightness of the halogen light.
Lens selection wheel
Ophthalmoscopes includes multiple viewing lenses which vary by device.
Focusing wheel
The focusing wheel might appear intimidating to the new user. However, it is easy to master with practice. Green is plus, and red is negative.
Brow rest
The brow rest allows the eye doctor or examiner to wear glasses while using the ophthalmoscope.
How to Use an Ophthalmoscope
Before you begin, it is necessary to modify your environment to make it suitable for testing. The area directly surrounding the patient should be cleared in order to allow for movement of the examiner and positioning of the scope. The examination room should have plenty of lighting options as many of the tests require a dimly lit room.
1.Begin by asking the patient to remove any eyeglasses or contact lenses. The examiner may leave their own corrective eyewear in place.
2.Verify the ophthalmoscope is in working order and switch it on. Keep in mind that a non-working ophthalmoscope may simply be out of batteries or need to be charged. Make sure to remove the cover from the aperture if there is one.
3.Darken or dim the room (this helps to dilate the pupil of the eye). Practitioners often use mydriatic drops to further pupil dilation; one drop of tropicamide 1% in each eye is considered the safest option. While dilating the eye maximizes the viewing capabilities, it is not necessary to use eye drops in order to carry out the fundoscopic exam. Undilated pupils will simply result in a smaller field of view.
4.Ask the patient to sit still and focus their gaze on a specific object (fixation target) in the exam room. It is best if this object is slightly to your side during the examination.
5.Set the ophthalmoscope light to maximum brightness and turn the dial until you see a round circle. You want this bright light to be white, so put your ophthalmoscope lens on the red-free filter. Many ophthalmoscope models come with an illumination lens dial that allows the examiner to check the lens before use, even in a darkened exam room.
6.Begin by performing a red reflex test. With the ophthalmoscope set to 0, hold approximately six inches from the patient and angle the light source 25 degrees toward the patient's eye. The purpose of the red reflex test is to check for the reflection of light from the retina. The absence of this reflection may indicate the presence of an eye disorder.
7.Hold the ophthalmoscope in your hand and place it against your cheek. Your head, hand, and scope should move as one unit. This will stabilize the instrument while in use.
8.With the ophthalmoscope about six inches from the patient, use your right hand and right eye to look through the ophthalmoscope at the patient's right eye. Adjust the wheel toward the negative or red end of the unit until your view is clear and in focus.
9.Move the ophthalmoscope 15 degrees from the center and look for the red reflex, following it until the retina comes into view. If you lose the red reflex, don't worry, just find it again and repeat.
10.Now that you have found the retina, your next move will differ slightly based on whether you are performing direct ophthalmoscopy or indirect ophthalmoscopy. If you are using a direct ophthalmoscope, pivot the ophthalmoscope by angling the device up, down, left and right. If you are using the PanOptic ophthalmoscope, you can similarly pivot using very slight movements, or you can ask the patient to look up, down, left and right.
11.Continuing with the red reflex as your guide, find the optic disc and turn the lens dial right or left until it comes into focus. You will need to move closer to the patient because the optic disc generally comes into view when you are one to two inches from the patient's eye. You need to be close enough to the patient to get the correct view, so don't be afraid to get cozy. Note that hyperopic (farsighted) eyes will require a more positive rotation of the lens (toward the green) for visualization, while myopic (nearsighted) eyes will require a more negative lens (rotate toward the red).
12.As you look upon the fundus of the eye and into the optic disc, follow the retinal arteries and examine the vascular arcades. For reference, there are four of these vascular arcades: inferonasal, superonasal, superotemporal and inferotemporal. In other words, follow each vessel as far out to the periphery as you can, paying attention to the shape, outline, color, and condition of the blood vessels.
13.The final part of the examination is an evaluation of the macula of the eye. To examine the macula, move the ophthalmoscope back several inches and ask the patient to look directly at the ophthalmoscope light. This can be a little uncomfortable for the patient but not to worry, it only takes a moment. The ophthalmoscope can also be used to view the anterior (front) of the eye by rotating the lens dial to 10. The red-free filter on your ophthalmoscope will assist in viewing the center of the macula.
14.Repeat these steps as outlined above on the left eye. Refer to the medical literature or seek expert advice as needed and report any abnormalities.
15.Clean all of your funduscopic tools with the appropriate disinfecting solution and put everything carefully away.
Common Ophthalmoscopic Observations and Diagnoses
Direct observation of the structures of the eye itself can reveal dangerous conditions such as retinal detachment or acute glaucoma, as well as less urgent visual impairments like cataracts. Because the vascular system can also be viewed within the retina of the eye, ophthalmoscopy may reveal important vascular changes due to high blood pressure and diabetes.
Ophthalmoscopy can also point out conditions like swelling of the optic nerve and infections such as endocarditis. As such, ophthalmoscopy is used in a variety of clinical settings beyond just the eye exam. A close look into the fundus of the eye is not uncommon in neurological examinations and may even be undertaken as part of a routine physical examination.
Some of the common abnormalities seen during a fundoscopic exam include:
Flame hemorrhage
Also known as an optic disc hemorrhage, this flame-shaped hemorrhage is oriented perpendicular to the margin of the optic disc. While researchers are unsure of the exact processes that lead to flame hemorrhages, they can indicate the risk of glaucoma.
Retinal pigmentation
This appears as irregular clumps of pigment that appear as dark deposits, usually seen around the periphery of the retina. Documentation and further monitoring will be required.
Arteriovenous nicking
Also known as av nicking, this is an indentation of the retinal veins by hardened (arteriosclerotic) retinal arteries. The most common cause of arteriovenous nicking is chronic, possibly uncontrolled hypertension (high blood pressure).
Retinal Cameras
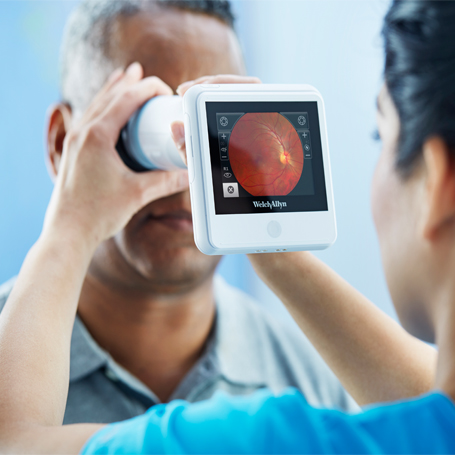
Diabetic retinopathy is the leading cause of blindness among working-age adults. According to research by Jama, documented compliance with annual retinal exams is often less than 50%. With early detection, 95% of vision loss cases can be prevented. Retinal cameras provide a detailed view of the retina. Welch Allyn, a leader in ophthalmoscopes and otoscopes, makes a cost-effective retinal camera called the RetinaVue 100 Imager. With the RetinaVue and RetinaVue Network, the test results can be transferred within the network and quickly reviewed by a remote specialist saving time and improving patient compliance.
The Welch Allyn RetinaVue 100 Imager is a digital hand-held eye-fundus camera used to record digital photographs of the fundus (including retina, macula and optic disc) of the human eye and surrounding area.
The Best Tool for Eye Exams
Ophthalmoscopes, with their bright white halogen light and system of optical lenses, provide a glimpse into the fundus of the eye and can reveal much about a person's health.
Ophthalmoscopy can bring attention to non-urgent conditions of the eye such as cataracts or vitreous floaters, as well as alert to dangerous changes taking place in the circulatory system, like vascular irregularities arising as a result of diabetes. The ophthalmoscope is useful for detecting foreign bodies in the cornea as well as distortions of the pupil.
It takes patience and practice to learn to confidently use an ophthalmoscope, but once these techniques are mastered, you'll be rewarded many times over with the opportunity to peer into one of the human body's most fascinating organs.
If you need assistance selecting an ophthalmoscope, contact USA Medical and Surgical Supplies today. Call 1-866-561-2380 or Email Us to speak with an experienced representative.
