
DICOM monitor for radiologists
11/11/2026 05:00:46
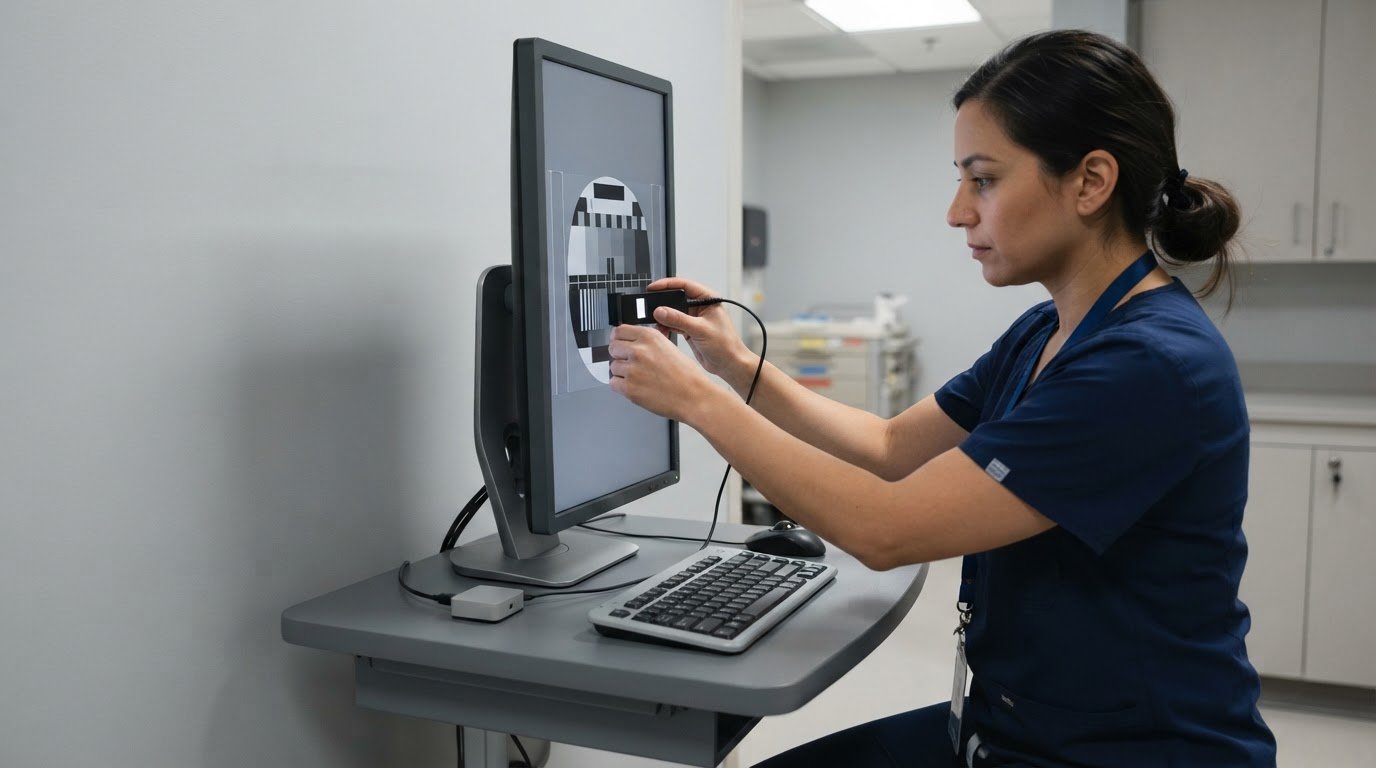
A larger screen alone doesn’t make a display suitable for radiology review. A DICOM monitor for radiologists should be considered as part of the complete display setup: calibration supports consistent grayscale presentation, while resolution, screen size, and configuration affect how images appear and fit on screen. The right setup also depends on whether the display is used for clinical review or diagnostic interpretation.
Specifications matter when choosing a monitor, but no single feature tells the whole story. Consider how the features work together, including how the display presents grayscale detail and how much image information fits on screen at once.
This guide explains how calibration and grayscale display affect image review, what resolution and screen size contribute, and how single- and multi-display configurations shape a workstation. You’ll also learn how to match a monitor setup to its intended use and assess its practical role.
Key Takeaways
- Understand how calibration supports consistent grayscale display during image review.
- Distinguish clinical review displays from displays intended for diagnostic interpretation.
- Assess screen size and resolution together to understand how images and detail appear on screen.
- Compare resolution categories by considering the imaging tasks and viewing needs involved.
- Learn how picture-by-picture and dual-controller setups can shape a radiology workstation.
DICOM calibration and grayscale display
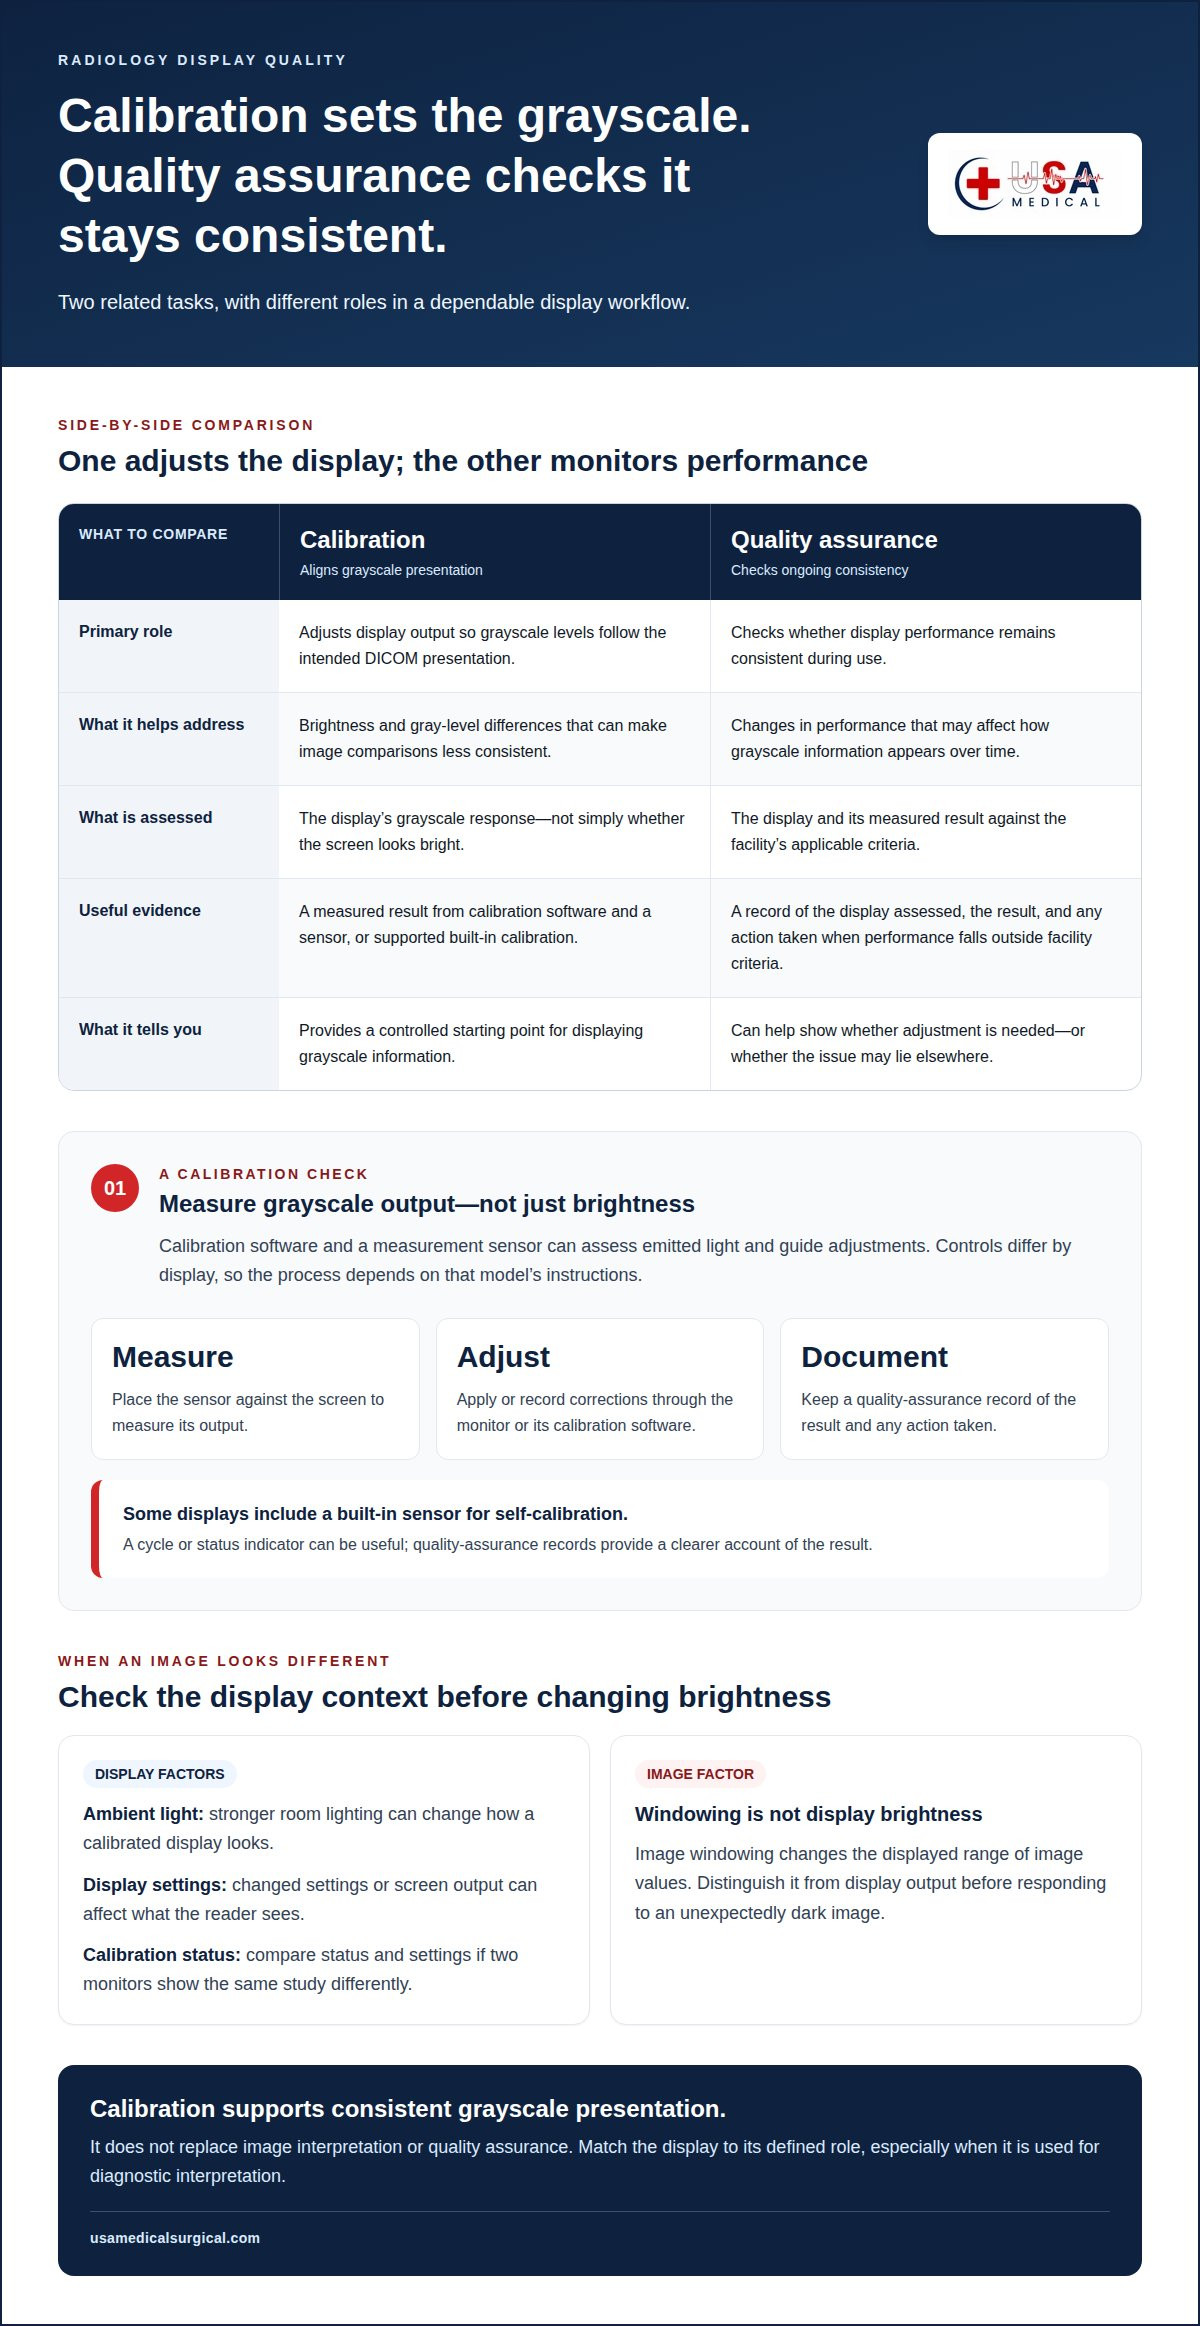
Calibration aligns a display’s grayscale presentation with the intended DICOM viewing curve. Without it, brightness and gray-level differences can vary, making image comparisons less consistent.
An uncalibrated monitor can make subtle grayscale transitions harder to distinguish and images less consistent across displays. This can complicate diagnostic review, especially when comparing studies or sharing images between workstations.
Calibration and Quality Assurance
Calibration adjusts a display’s output so grayscale levels follow the intended DICOM presentation. Quality assurance checks whether performance remains consistent during use. For example, a radiology department may assess a monitor after setup, after an adjustment, and during routine performance checks.
A practical quality-assurance process records the display assessed, the calibration result, and any action taken when performance falls outside the facility’s criteria. The schedule and acceptance limits depend on the applicable clinical workflow and equipment guidance. A calibration report documents a measured result, rather than relying on an assumption that the screen looks bright enough.
Consider the complete workflow, not just the initial adjustment. Ambient light, display settings, and changes in screen output can affect what a reader sees. If two monitors show the same study differently, compare their calibration status and settings before attributing the difference to the image. This matters especially when a DICOM monitor for radiologists is used for diagnostic interpretation.
Calibration does not replace image interpretation or quality assurance. It provides a controlled starting point for displaying grayscale information. A documented check can show whether the monitor needs adjustment or whether the issue lies elsewhere, such as a changed display preset or viewing environment.
Brightness Calibration
DICOM brightness calibration concerns how grayscale values appear across the display’s range, not simply whether the screen looks bright. The goal is to present differences in image intensity consistently and perceptually usefully. Raising the brightness control alone may change the appearance without aligning the display with its intended grayscale response.
Calibration software and a measurement sensor can assess emitted light and guide adjustments. The process generally involves placing the sensor against the screen, measuring its output, and applying or recording corrections through the monitor or its calibration software. Controls vary by display, so follow the instructions for that model.
Some displays include a built-in sensor for self-calibration. When supported, it can measure the screen and initiate or support adjustments without an external sensor. Self-calibration depends on the monitor’s design and software. A completed cycle or status indicator is useful, but quality-assurance records provide a clearer account of the result.
Assess brightness in context. A display calibrated in one environment may look different under stronger room lighting. Keep viewing conditions and image settings consistent during review, and avoid changing brightness to compensate for an image that looks unexpectedly dark. First distinguish display output from image windowing, which changes the displayed range of image values.
DICOM-compliant clinical review displays
Clinical review depends on a display’s intended use, image type, and viewing setup. DICOM-related display characteristics matter, but the label alone doesn’t establish suitability for every diagnostic task.
Display Sizes and Screen Formats
Screen size and format affect how images and viewing tools fit together. A widescreen format can place an image beside patient details or comparison views, while another layout may better suit the workstation’s established workflow. The key question is whether the full image remains viewable at an appropriate scale without obscuring relevant interface information.
For mammography, consider how the display presents a 2D mammogram and whether the workflow also includes 3D digital breast tomosynthesis (DBT). Tomosynthesis uses image slices, so readers may move through a series rather than assess one static image. Screen layout can affect how easily the current slice, prior images, and study controls are arranged during review.
Assess the actual image layout, not screen dimensions in isolation. For example, a radiologist reviewing a mammogram alongside a prior study needs enough usable display area for both views and their controls. The best format depends on the imaging task, viewing distance, image scaling, and workstation interface. Together, these factors help determine whether one screen or a wider layout supports the intended review.
Radiology Workstation Displays
A radiology workstation brings together the display, image-viewing software, study controls, and the reader’s workflow. DICOM-related grayscale presentation is one consideration; the clinical purpose and the display’s quality-assurance process matter too. Review use and diagnostic interpretation are not interchangeable, so match the monitor to its defined role.
At a workstation, assess how the display handles the studies read there. For example, a setup for general image review may differ from one assigned to mammography or DBT interpretation. Check how images, comparison studies, and controls appear together. Keep the viewing environment and display settings consistent with the facility’s established process.
Clinical review displays can provide access to imaging without automatically being suitable for every diagnostic task. Consider intended use, grayscale performance, and available quality-assurance records together. For mammography and DBT, the display arrangement should accommodate the relevant image sequence and comparison workflow. A product category or DICOM-related description alone doesn’t answer these practical questions.
Use a task-based selection process: identify the imaging modalities, map the workstation layout, and assess how each image appears in that setup. Include patient information and comparison views in the assessment, not just a single image. This makes screen format a workflow decision as well as a hardware choice. A diagnostic radiology monitor is one product category to consider for a radiology workstation.
Diagnostic monitor sizes and resolutions
Screen size describes the physical viewing area; resolution describes the image’s pixel dimensions. These properties work together, but they are not interchangeable. A larger screen with the same pixel dimensions spreads image pixels across more space, while a higher-resolution screen can show more image information. For a diagnostic setup, consider the image task and viewing distance together.
Match the display’s resolution to the images and software used in the clinical workflow. For example, image-viewing software may scale a study to fit the available window. Scaling can make the full image easier to see, but may change how image detail appears on screen. Both native display resolution and the software’s viewing controls matter.
Physical size affects how comfortably a reader can view images, controls, and supporting information. A screen that accommodates an image and its tools can reduce the need to rearrange windows. But size alone doesn’t establish how much detail is visible. Compare display area, pixel dimensions, image scaling, and normal viewing position together.
Color and grayscale displays serve different visual purposes. Grayscale presentation is central when distinctions between gray values carry information. Color can help distinguish interface elements, annotations, or overlays from the underlying image. For example, a colored measurement marker may be easier to locate against a grayscale image, while the image itself still needs clear tonal presentation.
Color capability does not automatically make a display suitable for every diagnostic task. Consider whether clinical software uses color for meaningful image information or only for controls and overlays. Monochrome displays focus on grayscale presentation, while color displays can show both grayscale images and color elements. Let the intended imaging use guide the choice.
The term “medical-grade” describes a product category, not a complete assessment of diagnostic suitability. Review the monitor’s stated intended use, image presentation capabilities, and support for the facility’s quality-assurance process. For example, a display used for clinical review may have different requirements from one assigned to diagnostic interpretation. Match the product documentation to the task.
A practical selection sequence is straightforward: identify the imaging workflow, determine how images and software controls appear together, then assess screen size and resolution in that context. Consider grayscale and color needs at the same time. This avoids choosing by diagonal size or a “medical-grade” label alone, and keeps the display decision tied to actual clinical use.
These figures can help frame a budget discussion, but the commenter’s descriptions are no substitute for comparing a particular display with the intended workflow and quality-assurance process. The page’s commenter describes diagnostic radiology display devices as FDA Class II devices. Treat the two price points as descriptions of monitor categories, and confirm the product’s stated intended use before deciding whether either option fits the clinical task.
Radiology monitor resolution categories
Resolution categories describe how a display’s pixel matrix supports image tasks, not a universal ranking. Compare the monitor’s native resolution with the image data and viewing workflow.
Resolution and Screen Size
A screen’s pixel matrix determines how many image pixels it can show at native scale. Physical size affects how those pixels appear from the reader’s viewing position. For example, the same image matrix may occupy different proportions on screens with different dimensions. Assess the image and workstation layout together, including whether controls or comparison views share the available area.
Resolution alone doesn’t establish diagnostic suitability. Consider the source image, viewing software, and how the image maps to the screen. If software enlarges or reduces an image, its displayed scale changes. For a practical assessment, open a representative study and review its detail from the intended workstation distance.
Medical Monitor Resolution Range
Medical displays have different pixel matrices because imaging tasks vary. A monitor for general clinical review may serve a different workflow from one used to interpret detailed radiology images. No single resolution category suits every modality. Match the display’s stated capabilities to the image type and clinical task.
Review the native resolution in the product specifications, then consider how the image-viewing system uses it. A larger matrix can provide more screen pixels for image data and interface elements, but it does not establish image quality on its own. Grayscale presentation, calibration, and workstation configuration also affect the viewing result.
Think in task-based categories rather than treating “high resolution” as a complete specification. For example, a workstation handling cross-sectional studies may need a different image layout from one used mainly to review reports alongside images. The intended workflow helps identify which display characteristics deserve priority.
Multi-Resolution Modes
Multi-resolution modes describe how a display handles different input resolutions or image sizes. Depending on the display and software, an image may appear at native scale, fit within a viewing area, or be enlarged. These options affect how much of the image is visible at once and how large its details appear.
Check how a representative study appears in each mode available on the workstation. For example, fitting a full image into a window can show its overall layout, while closer inspection may require zooming into a region. Both image-viewing software controls and monitor input settings can affect the result.
Keep the mode consistent with the clinical task and established workflow. If the display changes input resolution, scaling may alter image presentation or the arrangement of interface elements. A radiology workstation assessment should therefore consider the source image, display mode, and software view together. This helps distinguish a resolution limitation from a viewing-setting issue.
Picture-by-picture and dual controller
Picture-by-picture (PBP) displays inputs from separate sources side by side on one screen. A dual-controller feature can help users operate two connected computers through one monitor setup. These functions serve different workflow needs: PBP changes what appears on screen, while dual control concerns managing connected systems.
For example, PBP could show images from one workstation beside images from another source. The radiologist can view both areas without switching the monitor’s active input. Each image still depends on its source system, viewing software, and display settings. A side-by-side layout does not combine studies or ensure that they appear at matching scales.
Before using PBP for image review, consider the panel area assigned to each input. Dividing a screen reduces the space available to each view. A full study may need resizing or repositioning, and interface controls can take up additional room. Compare the layout with a realistic task, such as viewing a current image beside a prior study, and confirm key details remain practical to inspect.
Dual-controller functions typically coordinate a monitor’s connected computers, such as by allowing shared keyboard and mouse control. This can reduce desk clutter when a workstation includes separate systems for image viewing and other tasks. It does not mean the computers share image data, software, or clinical records. Each system continues to perform its own role.
For a radiology workstation, map the signal path before relying on either feature. Identify each computer, its video output, the monitor input receiving that signal, and the controls used to switch or share access. For example, label the source carrying diagnostic images and the one displaying administrative tools. Clear source identification helps prevent selecting the wrong view during a task.
- PBP: Review how images and controls fit within each divided screen area.
- Dual control: Identify which connected computers share input devices and how control changes between them.
- Workstation workflow: Test the source selection and layout using the tasks performed at that desk.
These features can organize a multi-source workstation, but they don’t replace appropriate display selection or image-viewing software. Assess how the complete setup works during the intended workflow, including source switching, window arrangement, and access to image controls. For diagnostic review, maintain a clear distinction between the image source and supporting computer functions.
USA Medical and Surgical Supplies
USA Medical and Surgical Supplies supports healthcare equipment needs with product categories such as Blood Pressure Devices, Dopplers, ECG Machines, and ECG Electrodes. The guidance above can help you assess display characteristics and match a workstation to its clinical review or diagnostic role. These equipment categories may also support broader clinical purchasing needs.
Use the display criteria in this article to clarify your monitor requirements, including image use, screen layout, and workstation configuration. For other clinical equipment needs, browse relevant product categories and compare options with your intended use in mind.
Contact USA Medical and Surgical Supplies to discuss your equipment needs.
Set a clear direction for your next display decision
Turn your display requirements into a practical workstation brief. Identify the intended clinical task, who will use the setup, and how it must fit existing imaging software and equipment. This gives procurement and radiology teams a shared basis for evaluating options, rather than relying on one specification or product label.
A DICOM monitor for radiologists should be considered within the wider workflow. The next step is to align the display choice with the facility’s operational needs and purchasing priorities. A concise brief can help keep decisions focused as requirements move between clinical and technical teams.
For broader medical equipment needs, USA Medical and Surgical Supplies offers products including Blood Pressure Devices, Dopplers, and ECG Machines. Contact USA Medical and Surgical Supplies to discuss your equipment requirements and take the next step with confidence.
Frequently Asked Questions
What is a DICOM monitor for radiologists?
A DICOM monitor for radiologists is a display configured to present grayscale medical images consistently for its intended review task. DICOM GSDF describes a standard grayscale response, helping align visible changes in luminance with image values. The term alone doesn’t establish that a display is suitable for every diagnostic use. Consider the monitor’s intended role, imaging workflow, and supporting quality-assurance process together.
What are the DICOM GSDF and calibration requirements for diagnostic displays?
DICOM GSDF is a grayscale display function that guides how image values translate into visible luminance steps. For a diagnostic display, calibration and quality assurance should follow the facility’s documented process and the monitor’s intended use. That process can define acceptance criteria, measurement methods, and records. Apply the same approach across comparable workstations so differences in image appearance can be assessed consistently.
How often should a radiology monitor be calibrated, and what tools are needed?
Calibration frequency should follow the facility’s quality-assurance schedule and the monitor’s calibration guidance. Common tools include a luminance-measuring sensor, calibration software, and the display’s supported controls. Some monitors include a built-in sensor; others use an external instrument. Follow the device instructions for sensor placement, then retain the result with the monitor’s records. Reassess after a relevant display or workstation change under local procedures.