
How to Choose the Right Blood Pressure Cuff Size: Clinical Sizing Guide
09/25/2026 12:29:07

Diagnostic blood pressure accuracy doesn't start with a monitor's digital calibration; it starts with a simple measuring tape. Even the most advanced diagnostic device produces skewed, unreliable numbers when paired with an ill-fitting blood pressure cuff. In clinical practice and routine home monitoring alike, an incorrect fit directly compromises diagnostic integrity.
You already know how frustrating erratic readings can be, especially when balancing varied patient demographics, non-standard limb shapes, or incompatible tubing connectors across manual and digital monitors. Squeezing an adult arm into a cuff that is too small artificially drives readings up, while using an oversized cuff masks real hypertension. Both scenarios lead to misdiagnosis, repeated checks, and unnecessary workflow bottlenecks.
Mastering cuff sizing and selection standards guarantees diagnostic reliability in every setting. This clinical guide outlines how to measure mid-upper arm circumference accurately, match measurements to standard cuff dimensions, and configure compatible tubing for efficient daily workflows.
Key Takeaways
- Learn the American Heart Association bladder ratio standard to eliminate artificial systolic spikes caused by improper cuff selection.
- Match mid-upper arm circumference measurements directly to standard blood pressure cuff categories, spanning pediatric to thigh sizes.
- Resolve hardware compatibility challenges by pairing the correct pneumatic connectors, such as luer locks or bayonet fittings, to manual and digital monitors.
- Implement compliant cleaning protocols and inspect bladder integrity to prevent cross-contamination and pneumatic pressure leaks between patient visits.
- Equip clinical examination rooms with modular, multi-size configurations designed to streamline routine patient intake.
Why Blood Pressure Cuff Size Determines Diagnostic Accuracy
A blood pressure cuff functions as an external pneumatic tourniquet designed to occlude the brachial artery evenly. When inflated, it transfers pressure through subcutaneous tissue to collapse the arterial wall. Understanding what a sphygmomanometer is highlights how this mechanical occlusion works alongside auscultation or oscillometric sensors to register pressure values. If the pneumatic bladder doesn't match the limb's physical dimensions, hydraulic transfer fails, and the monitor records inaccurate data.
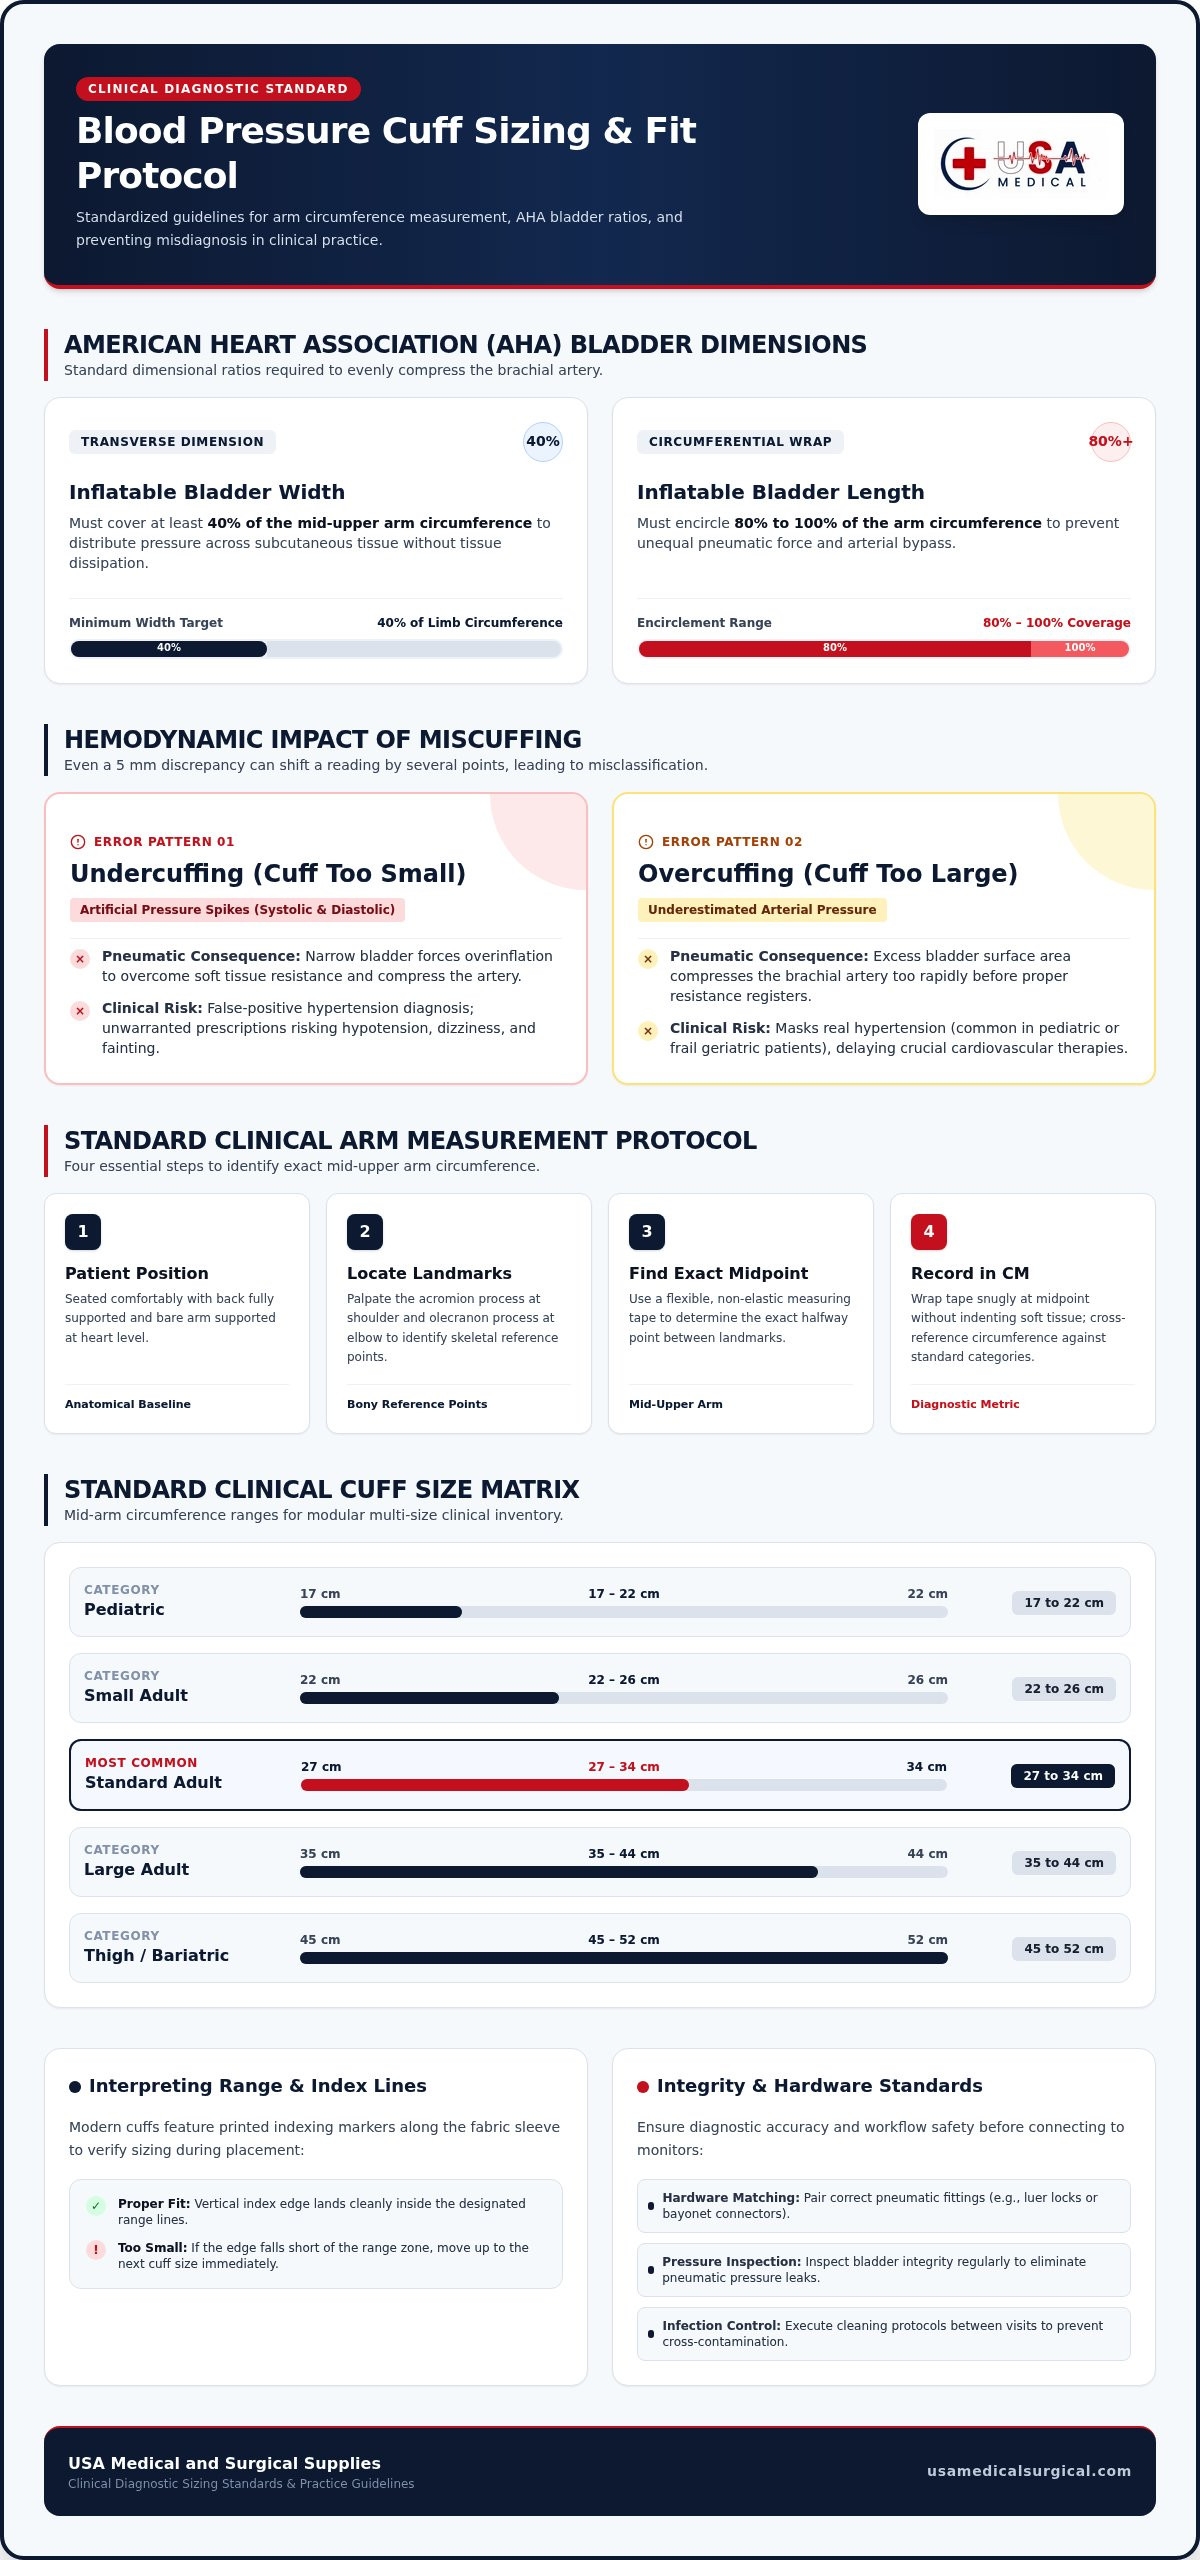
Undercuffing occurs when a cuff is too small for the patient's arm. This mismatch forces the bladder to overinflate to compress the artery, generating artificial spikes in both systolic and diastolic numbers. Overcuffing happens when the cuff is too large. In this scenario, excess bladder surface area compresses the artery too quickly, underestimating true arterial pressure. Clinical guidelines emphasize that limb circumferences vary widely across patient populations, making interchangeable cuff sizes mandatory for diagnostic integrity.
The Hemodynamic Mechanics of Cuff Inflation
Pneumatic pressure must compress soft tissue uniformly until the arterial walls completely close. If the bladder is too narrow relative to limb circumference, friction and soft tissue resistance dissipate the pressure before it reaches the vessel. The monitor then requires higher inflation levels to halt arterial flow. Even a five-millimeter discrepancy can shift a reading by several points. That slight variance is enough to misclassify a patient's hypertension stage and trigger unneeded clinical interventions.
The Clinical Impact of Miscuffing in Primary Care
Miscuffing introduces systematic errors into patient records. Undercuffing commonly causes false-positive hypertension diagnoses. Clinicians may prescribe antihypertensive medications to normotensive patients, creating risks of dizziness, fainting, and hypotension. Conversely, placing an oversized cuff on a pediatric arm or a frail geriatric patient masks elevated pressures, delaying necessary cardiovascular therapies. Validating cuff fit must be standard procedure before recording vitals:
- Measure mid-upper arm circumference before attaching the device.
- Select a cuff bladder width that covers 40 percent of the arm circumference.
- Ensure the bladder length encircles 80 to 100 percent of the limb.
Standard Blood Pressure Cuff Sizing Chart and Measurement Protocol
Accurate vital signs depend on adhering to the American Heart Association (AHA) bladder ratio. An appropriate blood pressure cuff must feature an inflatable bladder width equal to at least 40 percent of the arm circumference and a bladder length that encircles 80 to 100 percent of the limb. Eyeballing arm diameter often causes clinicians to select the wrong cuff. Routine practice requires standardized measurement tools and anatomical landmarks to determine the correct size category.
Step-by-Step Arm Circumference Measurement Protocol
Position the patient seated with their back supported and the bare arm resting at heart level. Palpate the acromion process at the shoulder and the olecranon process at the elbow. Use a flexible, non-elastic measuring tape to find the exact midpoint between these two skeletal landmarks. Wrap the tape snugly around the limb at this midway point without indenting soft tissue. Note the circumference in centimeters and cross-reference the number against standard clinical cuff dimensions.
Clinical Cuff Size Classification Reference
Clinical workflows demand a comprehensive selection of cuffs to match diverse body shapes. Medical facilities can browse the inventory at USA Medical and Surgical Supplies to source complete cuff sets spanning every standard clinical category:
- Pediatric: 17 to 22 cm mid-arm circumference
- Small Adult: 22 to 26 cm mid-arm circumference
- Standard Adult: 27 to 34 cm mid-arm circumference
- Large Adult: 35 to 44 cm mid-arm circumference
- Thigh / Bariatric: 45 to 52 cm mid-arm circumference
Interpreting Cuff Range and Index Lines
Modern cuffs feature printed indexing markers along the fabric sleeve to verify sizing during placement. When wrapped around the mid-upper arm, the vertical index edge must land cleanly inside the designated range lines. If the edge falls short of the range zone, the cuff is too small; move up to the next size immediately. If the edge overlaps beyond the range markings, the cuff is oversized. Checking these indicators before inflating prevents inaccurate readings and unnecessary repeat measurements.
Manual vs Digital Blood Pressure Cuffs: Tube and Connector Selection
Choosing the right blood pressure cuff involves more than selecting the correct sleeve circumference. You must also match the cuff's pneumatic plumbing to your diagnostic hardware. Clinical facilities frequently operate a mix of wall-mounted aneroid gauges, mobile diagnostic carts, and automated digital monitors, each requiring distinct hose architectures and terminal fittings.
Aneroid Sphygmomanometer Dual-Tube Architectures
Traditional manual sphygmomanometers rely on dual-tube systems to maintain stable airflow. One tube connects the manual inflation bulb to the bladder, while the second routes air from the bladder to the aneroid manometer gauge. This two-line division prevents needle oscillation while the clinician modulates the thumbscrew exhaust valve during auscultation. While handheld pocket aneroids sometimes combine the gauge directly onto a single-tube inflation bulb, standard wall-mounted clinical stations depend on dual-tube configurations to deliver accurate pneumatic readings.
Automated Digital Monitor Single-Tube Interfaces
Automated digital monitors almost universally utilize a single pneumatic line. The internal pump inflates the bladder through this line, then reads oscillometric pressure pulses through the same channel during deflation. Interchanging cuffs between different automated monitors requires verified connector compatibility:
- Push-in barbs: Straight friction-fit connectors commonly used on dedicated portable monitors.
- Screw-type luer locks: Threaded metal or rigid plastic collars that provide a twist-lock airtight seal.
- Bayonet connectors: Push-and-twist keyed fittings standard across many institutional multi-parameter systems.
Damaged O-rings or cracked plastic push connectors introduce insidious pneumatic leaks. These micro-leaks disrupt oscillometric algorithms, causing monitors to display inflation errors or overinflate unnecessarily.
Material Durability and Latex-Free Standards
Every clinical blood pressure cuff must feature 100 percent latex-free construction to protect sensitive patient demographics from adverse allergic reactions. Bladder longevity depends on heavy-duty elastomeric polymers that withstand high daily inflation cycles without stretching thin. For outer sleeves, woven nylon with reinforced hook-and-loop closures provides exceptional durability for high-volume outpatient clinics. For environments requiring rapid room turnover, non-porous polyurethane sleeves allow immediate wipe-down disinfection without fluid penetration.
Infection Control, Maintenance, and Cuff Replacement Protocols
Every reusable blood pressure cuff functions as a high-touch non-critical medical surface under CDC guidelines. Because cuffs contact intact skin across dozens of patients each week, they easily harbor transmissible environmental pathogens. Clinical practices must implement rigorous intermediate-level disinfection protocols between patient encounters to eliminate cross-contamination risks without degrading equipment materials.
Surface Disinfection and Chemical Compatibility
Use EPA-registered hospital disinfectant wipes formulated with quaternary ammonium compounds or accelerated hydrogen peroxide. Wipe all external surfaces thoroughly, paying close attention to the inner lining that contacts bare skin. Adhere strictly to the manufacturer's wet contact dwell time, which typically ranges from one to two minutes, to achieve complete antimicrobial efficacy.
Never submerge cuffs with internal pneumatic bladders in liquid cleaners. Fluid ingress through air lumens ruins the bladder and damages connected monitors. If laundering machine-washable fabric sleeves, always remove the elastomeric bladder first, seal all hook-and-loop fasteners to prevent lint accumulation, and air-dry the fabric thoroughly before reassembly.
Identifying Bladder Leakage and Mechanical Wear
Physical degradation compromises pneumatic stability long before a cuff fails outright. Staff should inspect diagnostic cuffs weekly for common wear indicators:
- Frayed, peeling, or debris-clogged hook-and-loop strips that slip under high pressure.
- Cracking, hardening, or discolored inflation tubing near port connections.
- Micro-tears along bladder heat-sealed seams that cause slow pressure loss.
Perform a rapid pressure retention check to verify structural integrity. Wrap the cuff snugly around a rigid cylinder, inflate it to 200 mmHg, and close the airflow valve. If the gauge needle or digital pressure display drops more than 2 to 3 mmHg over a sixty-second span, the assembly has an active pneumatic leak. Retire leaking units immediately. To replenish high-wear diagnostic supplies, order replacement blood pressure cuffs and parts to maintain compliant, uninterrupted clinical operations.
In high-turnover acute settings or isolation rooms, transition to single-patient disposable cuffs. Single-use solutions eliminate routine reprocessing between exams and cut transmission vectors for immunocompromised patients.
Equipping Your Practice: Sourcing Reliable Blood Pressure Devices
Clinical accuracy requires consistent equipment availability across every intake area. A clinician cannot adhere to sizing standards if the right blood pressure cuff isn't within arm's reach during triage. Equipping an outpatient facility requires balancing durable diagnostic hardware, such as wall-mounted aneroids and mobile vital signs monitors, with modular inventory that accommodates diverse patient limb sizes.
Procuring Multi-Cuff Sets for Outpatient Intake
Every examination room requires immediate access to small adult, standard adult, and large adult cuffs. Relying on a single universal sleeve compromises clinical precision and slows down intake workflows. Setting up dedicated multi-cuff stations eliminates the time staff spend searching neighboring rooms for correct sizes.
To optimize daily intake efficiency and maintain reliable inventory:
- Use color-coded sleeves: Visual cues allow medical assistants to select the correct size instantly, reducing miscuffing errors during rapid patient check-ins.
- Establish par levels by encounter volume: Standard adult sleeves experience the highest wear. Maintain a two-to-one par level of adult cuffs relative to pediatric and large adult sizes.
- Stock universal pneumatic adapters: Keep spare push-in barbs and screw-type luer connectors in storage drawers to replace cracked fittings without taking monitors offline.
- Equip mobile stations with bariatric cuffs: Keep thigh cuffs accessible on centralized mobile carts so intake staff can manage larger limb profiles smoothly.
Ordering Clinical Equipment Through USA Medical and Surgical Supplies
Standardizing diagnostic instruments across your facility reduces maintenance headaches and ensures repeatable accuracy. Outpatient practices, surgical centers, and home care providers can source verified blood pressure devices and diagnostic supplies through reliable online procurement. Having a dependable equipment partner ensures exam rooms stay fully stocked with compatible replacement parts.
USA Medical and Surgical Supplies delivers professional diagnostic tools nationwide. Facilities can easily configure aneroid wall units, mobile digital stands, and latex-free replacement cuffs tailored to high-volume clinical practice. Streamlined national distribution keeps clinic operations running smoothly, ensuring your team has the dependable instruments necessary for uncompromising diagnostic care.
Elevate Diagnostic Precision Across Every Patient Encounter
Diagnostic confidence begins with adhering to verified clinical standards. Measuring mid-upper arm circumference at the anatomical midpoint and maintaining the standard bladder ratio eliminates the diagnostic risks of undercuffing and overcuffing. Pairing the proper blood pressure cuff with compatible pneumatic fittings and conducting routine seal checks preserves diagnostic integrity across both manual sphygmomanometers and digital monitors.
Outfitting triage rooms with full size ranges, color-coded sleeves, and reliable infection control supplies protects patient health while streamlining intake workflows. USA Medical and Surgical Supplies supports outpatient practices and care facilities with an extensive diagnostic instrument catalog meeting strict clinical specifications. Direct nationwide fulfillment makes keeping your inventory stocked straightforward and dependable. Explore clinical blood pressure devices and diagnostic supplies to equip your facility with instruments built for consistent, repeatable diagnostic precision.
Frequently Asked Questions
What happens if a blood pressure cuff is too small for the patient?
Using an undersized cuff artificially inflates systolic and diastolic blood pressure readings. This error, known clinically as undercuffing, occurs because a narrow bladder cannot transmit pressure evenly through arm tissue to occlude the brachial artery. The clinician or automated unit must apply excess pneumatic pressure to collapse the vessel. This mechanical error frequently causes false-positive hypertension diagnoses and leads to inappropriate medication prescriptions.
Can you use any brand of blood pressure cuff with a digital monitor?
You can use alternative cuff brands with a digital monitor as long as the pneumatic tube connector matches the monitor's port and the bladder volume aligns with its calibration. Many digital units rely on proprietary plastic push plugs or specific bayonet fittings. If you switch brands, you must transfer the original connector barb to the new tubing or source an adapter that creates an airtight seal without restricting airflow.
How do you measure an arm to determine the correct blood pressure cuff size?
Measure mid-upper arm circumference using a non-elastic medical measuring tape directly against bare skin. Locate the midpoint between the acromion process at the shoulder and the olecranon process at the elbow while the patient rests their arm at heart level. Wrap the tape smoothly around this midpoint without compressing soft tissue. Record the measurement in centimeters and select the cuff category corresponding to that range.
Is there a difference between a manual blood pressure cuff and a digital monitor cuff?
The primary difference lies in pneumatic line architecture and pressure sensing. Manual aneroid sphygmomanometers typically feature dual-tube cuffs; one tube feeds the manual inflation bulb and valve, while the second connects to the pressure gauge. Digital monitors use a single-tube blood pressure cuff where one pneumatic line handles both bladder inflation and oscillometric pulse sensing. Using a manual cuff on a digital unit requires blocking or adapting the secondary line.
What is the standard blood pressure cuff size used in primary care clinics?
The standard adult cuff is the baseline model in adult primary care clinics, designed to fit mid-arm circumferences between 27 and 34 centimeters. However, a single standard size isn't sufficient for safe clinical practice. Outpatient facilities must keep small adult (22 to 26 cm) and large adult (35 to 44 cm) options in every examination room to accommodate diverse patient populations and prevent miscuffing errors during triage.
How often should clinical blood pressure cuffs and bladders be replaced?
Clinical cuffs and bladders typically require replacement every one to two years, depending on patient encounter volumes and chemical cleaning frequency. High-traffic outpatient triage stations may require replacements sooner if hook-and-loop fasteners lose grip or seam micro-tears emerge. Perform routine pressure-retention checks. If a closed system leaks more than 2 to 3 mmHg over sixty seconds under a 200 mmHg test load, replace the assembly immediately.
How do you properly disinfect a reusable blood pressure cuff between patients?
Wipe all external surfaces with an EPA-registered hospital disinfectant wipe, such as a quaternary ammonium or accelerated hydrogen peroxide formulation. Thoroughly wipe the inner surface that contacts patient skin, keeping it visibly wet for the full dwell time indicated on the chemical label. Never submerge cuffs containing internal bladders in liquid. If machine-washing removable fabric sleeves, remove the elastomeric bladder first and secure all fasteners before laundering.